How to fix Multilevel list in Word

For many, creating and fixing multilevel lists in MS Word is a nightmare. Documents with hundreds of pages and multiple heading levels are particularly difficult to manage in Word. In this article, we’re discussing a few tricks to quickly fix and streamline messy multilevel numbered heading as quickly as possible.

I am assuming, you already know how to create Multilevel list in Word (if not, learn here: https://wordknowhow.wordpress.com/2013/01/30/how-to-use-multilevel-numbered-headings-in-the-word/).

In your current document, where the list numbering has gone wrong:

1.   Select the first heading level and then from the Word Main menu, under the tab Home, within the group Paragraph, click the Multilevel List icon. A drop-down list appears. See below.

2.   From the drop-down list, click option Define New Multilevel List. Define New Multilevel List dialog box appears.

Picture3

3.   From the dialog box, click button More (available on the left bottom corner). The dialog box expands with additional fields. At this point, understand that the main reasons for the numbered headings going out of order are due to the missing links between heading levels that you have applied and the corresponding default heading styles of Word. We will restore the links using the Define New Multilevel List dialog box.

4.   In the dialog box, you can see the heading levels as 1, 2, 3,….9 on extreme left under the label “Click level to modify”. Assume that these are the heading levels in your document. Click heading “1” and subsequently from the drop-down list Link level to style , select Heading 1 style.

Picture2

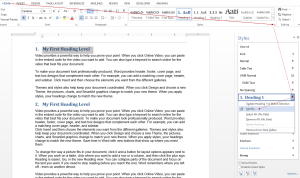
Similarly, restore connections for the rest of the heading levels (heading 2, 3, …etc.) in your document. Click OK.   Once you are done with establishing connections between the heading levels in the document to default heading levels, apply the same to all heading 1s,  all heading 2s, and so on in the document. Keeping your heading 1 selected in the document, click Alt+O+S. The Styles pane appears on the right.

1.   Locate the heading level 1 in the Styles pane.Place mouse cursor over it. The heading level gets selected.

2.   Click the down arrow button on the extreme right. A drop-down list appears. See below image.

3.   From the drop-down list, click option Update Heading 1 to Match Selection. As a result, all the Heading 1s in your document will be linked to default heading 1. Do the same for the rest of the levels (heading 2, heading 3, etc.) in your document.

Picture1

How to create multilevel lists in Word

Creating and fixing multi-level numbered headings in Word might seem to be a bit tricky for the first time users. Nevertheless, if you know the correct procedure, it would be a piece of cake!

Note: If you’ve already created a list, but ran into a problem, read this to fix your list: https://wordknowhow.wordpress.com/2013/05/20/how-to-fix-multilevel-list-in-word/

Follow the steps stated below to create a new multilevel numbered list the correct way:

The Procedure

Firstly, we will define the multilevel numbering for the heading levels using Multilevel List feature.

1.     Open the Word document in which you want to apply numbered headings.

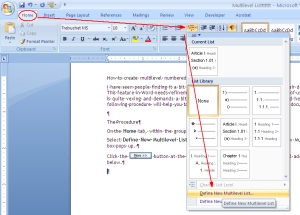
2.     From the Word Ribbon menu, under the tab Home and within the group Paragraph, click the Multilevel List icon multi list button .  A drop-down menu appears.

(Click the image to view in full screen)
define new multi level list

2.     From the drop-down menu, select the option Define New Multilevel List (at the bottom of the menu). The “Define New Multilevel List” dialog box pops up.

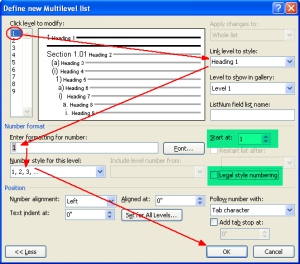
3.     Click the More button  (Picture1)  available at the bottom of the dialog box. The dialog box expands to show additional fields (see below image).
define new multi level list dialog
Create First Level Heading   (or define number format for the first level heading)

4.     Click level “1” from Click level to modify selection box (on the top left hand side of the dialog box).

5.     From the drop-down list named Link level to style, select “Heading 1”.  This way, you are linking heading level “1”  (that you will use in your document) to Word’s default Heading 1 style from the Styles gallery. Later, you can modify style for each heading as you wish.

6.     In this step, enter a numbering format for your heading level 1 in the field Enter formatting for number from the drop-drop-down list Number style for this level. So, the format you select from the drop-down list will appear in the Enter formatting for number field. You can delete the default number format appearing in the Enter formatting for number field and choose your own.

Important:
a.    You can reset the value in the Enter formatting for number field by selecting a value from the spin box Start at.
b.    If you find the field Number style for this level as disabled, clear the check box Legal style numbering.
Creating Second Level Heading

7.     Similarly, select level “2” from Click level to modify selection box.

8.     Link level 2 to Word’s default Heading 2 by selecting “Heading 2” from the Link level to style drop-down list.

9.     Delete whatever appears (by default) in the field Enter formatting for number to apply a new number format. From the field Include level number from, select Level 1 (as a prefix) for the second level heading. Apply a dot (.) or anything you would like after the prefix number. I prefer a dot.

10.     After a dot (.)select a numbering format for the Level 2 heading (e.g. 1.1). You are done.

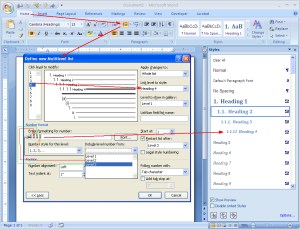
11.     Similarly, you can keep adding levels as needed. While creating the third heading, select Level 1 and Level 2 headings as prefixes from the Include Level Number from field and then select a number format for the Level 3 heading (e.g. 1.1.1 ).

The following example shows how to construct the Heading level 4.
untitled
Once you are done with defining number format for all the headings, you can view the same being updated in the Styles gallery, under the tab Home, within the group Styles in the Ribbon. Or, you can open the Styles window by pressing Shift+Ctrl+Alt+S.

Now, select text in your document (which you want as a heading) and then click the relevant heading style (which you have just created) from the Styles gallery.

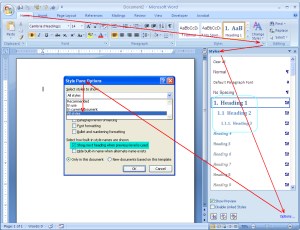
Please note that you may not see all the  multilevel heading levels (that you have just created) in the gallery depending on the configuration of the Style Pane Options. You can open the Style Pane Options dialog box by clicking the Options link available at the bottom of the Styles gallery pane. See below image.
untitled

The Style Pane Options window appears. Click Select styles to show drop-down list and select the option All Styles from the list. Click OK. Now you can view all the 9 heading levels with multilevel numbering in the Styles gallery.
Modify the appearance of the headings

You can modify the style (font, numbering, etc.) of the headings from the styles gallery by selecting Modify from the right-click menu of each heading and then clicking the Untitled button from the Modify Style dialog box.

For example, if you want your Heading 1 to have font “Cambria”, font size “14”, Bold, color Blue then configure these in the Modify Style dialog box as shown in the following screenshot.

untitled

You can also apply these style by clicking the Format  button available at the bottom of the Modify Style dialog box and then clicking the Font from the sub-menu. This will display the Font dialog box where you can apply font styles for Heading 1.

Similarly, you can modify other properties of the headings by selecting the appropriate options from the Format sub-menu.

Please let me know in the comment section if you have any difficulty understanding the procedure or if you have any other queries, suggestions, etc. I will be more than happy to help you out! Thank you.

The following post could also be helpful to you:

https://wordknowhow.wordpress.com/2013/05/20/how-to-fix-multilevel-list-in-word/

All you need to know about shapes in Word(insert shape, fill color, add text, change shape, group shape, rotate shape)

How to insert a shape in a Word document?

To insert a shape

  1. On the ribbon menu, under the tab Insert, within the group illustrations, click icon Shapes.  A drop-down list appears with various shapes.
  2. Click a shape, the mouse cursor changes to a ‘+’ sign.
  3. Draw the shape in your document.
  4. Resize the shape by dragging the resize handles.

To add/remove fill color and outline color of a shape

  1. Select the shape in the document.
  2. Click tab Format under Drawing Tools.
  3. Within group Shape Styles, click icon Shape Fill and then
    1. Select a fill color from the palette.
    2. Click ‘No Fill’ to remove fill color.
  4. Within group Shape Styles, click Shape Outline, and then
    1. Select an outline color for the shape.
    2. Click ‘No Outline’ to remove the outline color of the shape.

How add text to a shape in Word

  1. Select a shape and right-click.
  2. From the right-click menu, select option Add Text.


How to change a shape?

  1. Select the shape in the document.
  2. Click tab Format under Drawing Tools from the ribbon menu.
  3. Within group Insert Shape, click Edit Shape.
  4. From the drop-down list, select option Edit Shape.
  5. Select a new shape.

How to group shapes in a document

  1. On the ribbon menu, under the tab Insert, within the group illustrations, click Shapes.
  2. Press and hold the keys CTRL or SHIFT or CTRL+SHIFT and click the shapes one by one.
  3. Right-click and click Group and the click Group from the sub menu.

How to rotate a shape

  1. Select the shape.
  2. Click tab Format under Drawing Tools from the ribbon menu.
  3. Within the group Arrange, click Rotate.
  4. From the drop-down menu, select any of the options or click ‘More Rotation Option’.
  5. In the Layout dialog box, under the tab Size, enter the angle of rotation.
  6. Click OK.

How to rotate text inside a shape

  1. Select text inside a shape.
  2. Click tab Format under Drawing Tools from the ribbon menu.
  3. Within the group Text, click Text Direction.
  4. Select an option from the drop-down list.

About me

How to rotate and add a caption to a picture?

To rotate a picture?

  1. Select the picture.
  2. On the ribbon menu, click the tab Format under Picture Tools.
  3. Within the group Arrange, click icon Rotate.
  4. From the drop-down list, select an option to rotate the picture. To provide a custom angle for rotation, select “More Rotation Options…” and provide an angle under section Rotation.

How to add caption to a picture?

  1. Select the picture.
  2. On the ribbon menu, under the tab References, within the group Captions, click Insert Caption. Caption dialog box appears.
  3. Enter a caption for the picture in the Caption field.
  4. Click OK.

Shortcut key method

  1. Select the picture.
  2. Press keys ALT, S, P (one key after another)
  3. Follow step 3 and 4 of the above procedure.

How to add and remove border (colored border) around a picture


//


First method:

  1. Select the picture.
  2. On the ribbon menu, click the tab Format under Picture Tools.
  3. Within the group Picture Styles, click Picture Border. From the drop-down, select the border color

Second method:

  1. Select the picture.
  2. On the ribbon menu, under the tab Home, within the group Paragraph, click the down arrow icon
  3. Within the group Picture Styles, click Picture Border. From the drop-down, select the border color.
  4. Select the image.
  5. On the ribbon menu, under the tab Home, within the group Paragraph, click the down arrow button beside Borders. A drop-down list appears.
  6. Select option Borders and Shading. Borders. Borders and Shading dialog box appears.
  7. Under the tab Borders, select border type as Box. Select color and width of the border lines.
  8. Click OK.

Shortcut key method:

  1. Select the picture.
  2. Press the ALT key and then press keys J P S O one after another.
  3. Select the border color and press ENTER.

How to fix position of an image in a Word document?

To fix a picture in a line in the document

  1. Select and drag the picture to the line in the document.
  2. On the ribbon menu, click the Format tab under Picture Tools.
  3. Under Format tab, within the group Arrange, click Wrap Text.
  4. Select option In Line with Text from the drop-down list.

Shortcut key method to insert a picture

  1. Select and drag the picture to the line in the document.
  2. While keeping the picture selected, press the ALT key and then press the keys J P T W I one after another.

How to insert a pictures into a Word document (offline and online)

How to insert a pictures into a Word document

  1. Place mouse cursor in the document where you want to insert the picture
  2. On the ribbon menu, under the tab Insert, within the group Illustrations, click Pictures. The Insert Picture dialog box appears.
  3. Browse and select the picture from your system.
  4. Click Insert. Word inserts the picture in the cursor position.


Shortcut key method to insert a picture

  1. Place the cursor in the document where you want to insert the picture.
  2. Press the ALT key and then press keys N and P one after another. The Insert Picture dialog box appears.
  3. Follow steps 3 and 4 of the above procedure.


How to insert pictures from an online source

  1. Place mouse cursor in the document where you want to insert the picture.
  2. On the ribbon menu, under the tab Insert, within the group Illustrations, click Online Pictures. Insert Picture dialog box appears.
  3. You can either search free clip art pictures in Office.com (royalty free) or search images in entire Internet world using Bing search engine.
  4. Select an image and click Insert.

How to import content from a Word document to PowerPoint or convert Word document to PowerPoint

You can import content from a Word document to a PowerPoint presentation without much difficulty. This saves you from significant manual effort otherwise required to copy paste content from Word to PowerPoint.

The procedure is pretty straight forward too.

Procedure:

  1. Start PowerPoint.
  2. Click File and then click New (or CTRL+N) to create new presentation.
  3. On the Insert tab, within group Slide, click New Slide. A drop-down appears.
  4. Select Option Slides from Outline…from the drop-down list. You are done.


Important: Before you import a Word document to PowerPoint, make sure that the document is properly formatted.

If you are not using any heading styles, PowerPoint places each paragraph in individual slides. Therefore, content should be in single paragraph to find a place in single slide.

If you are using heading styles (heading 1, heading 2, etc.), PowerPoint creates a new slide for each subsequent similar headings i.e. two subsequent Heading 1s will have two different slides in the presentation. The content that would appear along with a Heading 1 slide must have a heading style lower i.e. Heading 2, Heading 3, etc.

How to remove recent documents in Word

The Recent Documents (FILEà Open à Recent Documents) in Word lists the most recent documents you have worked. Quite a handy feature, which enables you to quickly locate a recent document and saves you from the pain of browsing through folders. Word provides the flexibility to choose the number of recent documents to appear.

However, if you don’t want people (with whom you share your system) to know the documents you are currently working, you can restrict Word not to display none of the recent documents.

Procedure

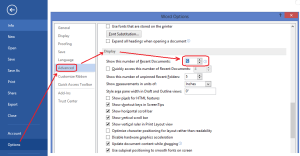
  1. Click FILE and then select Options from the bottom of the menu. The Word Options dialog box appears.
  2. Click category Advanced from the left hand side pane.
  3. On the right hand side, under the section Display, reset the value to zero in the field “Show this number of recent documents”.
  4. Click OK.

test


How to add a new word to Word’s spell check dictionary, create a custom dictionary, and change default dictionary

How to add a new word to Word’s spell check dictionary?

Word highlights a new word (not included in its main dictionary) with a wavy red underline to show it as a misspelled word. If you want a new word to add to the main dictionary, you have two ways:

First method (automatically):

  1. In the document, right click the Word with the wavy red underline.
  2. From the right-click menu, select option Add to Dictionary. The new word is added to the default dictionary.


Second method (manually):

  1. Click the File tab on the Ribbon menu.
  2. From the File menu, select Options. Word Options dialog box appears.
  3. On the Word Options dialog box, click category Proofing on the left pane.
  4. On the right hand pane, click the Custom Dictionaries button. Custom Dictionaries dialog appears.
  5. In the Custom Dictionaries dialog, click Edit Word List button.
  6. Type the new word in the Word(s) field. Then click Add.

Untitled1

How to create a custom dictionary and set the same as the default dictionary to which new words are added

To create a custom dictionary

  1. In the Custom Dictionaries dialog box (see step 4 of above), click the New button.
  2. Enter the name of the new dictionary. Click Save.


How to use a custom dictionary as the default dictionary to hold the new words

After you have created a new dictionary as shown above using the Custom Dictionaries dialog box, select the dictionary and then select the language from the Dictionary Language list.

Word creates a new language category and places the custom dictionary under the language.


How to change default dictionary

If a language has multiple dictionaries listed in the Custom Dictionaries dialog box, and you wish to change the default dictionary for the language then select the custom dictionary and click the Change Default button.


How to convert PDF to Word Doc in MS Word 2013

For me, this is the coolest of all the new features of Word 2013, the ability to convert PDFs to editable docs in Word. The process is dead simple and the output is equally good. So, no more trying your luck with online PDF converters or freewares with unpredictable results.

The procedure

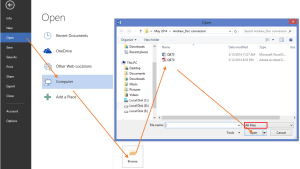
  1. Click FILE.
  2. Click Open.
  3. Click Computer.
  4. Click Browse (from bottom). The Open dialog box appears. Select the PDF from your computer. If you are unable to see any PDF in the target folder, on the Open dialog, select option All Files.
  5. Click Open. Word displays a warning message. Click Ok.
  6. Click Save As from FILE menu to save the document.

Untitled1

How to format an ActiveX controls (checkbox, text box, options box, drop-down list, etc.)


Each ActiveX control element has a Properties sheet associated with it. This enables you to format the appearance, behavior, font, data, etc. of the ActiveX control elements.

How to open the Properties sheet

The properties sheet of an ActiveX control element can only be opened in Design Mode. Let us understand this with an example. Now, try to insert the Text Box ActiveX control into your document.

To insert a text box

On the Ribbon menu, under the tab Developer, within the group Controls, click the Legacy Tools icon. A drop-down list appears.

To switch to Design Mode

Select Text Box (ActiveX Control) element from the list. A text box is inserted at the cursor position. By default, the text box is in Design Mode. You can switch it on and off by clicking the Design Mode icon on the Ribbon.

In Design Mode, you can view the Properties icon (just beneath it) enabled. Click this icon to view the Properties sheet.

(Alternatively, in Design Mode, you can right-click the Text box and select option Properties.)

Properties Sheet

Once the Properties sheet is opened, you can see a list of properties of the Text box element under the tab Alphabetic. The same properties are also available under the tab Categorized, but grouped under various headings.

To change a property, click the adjacent cell. Similarly, you can modify all other properties listed.

In Design Mode, you can use the resize handles of the text box to adjust its size.

You can move the text box to the right or left in a line by placing the mouse cursor just in front of the text box and then pressing the TAB and “TAB+SHIFT” keys respectively.